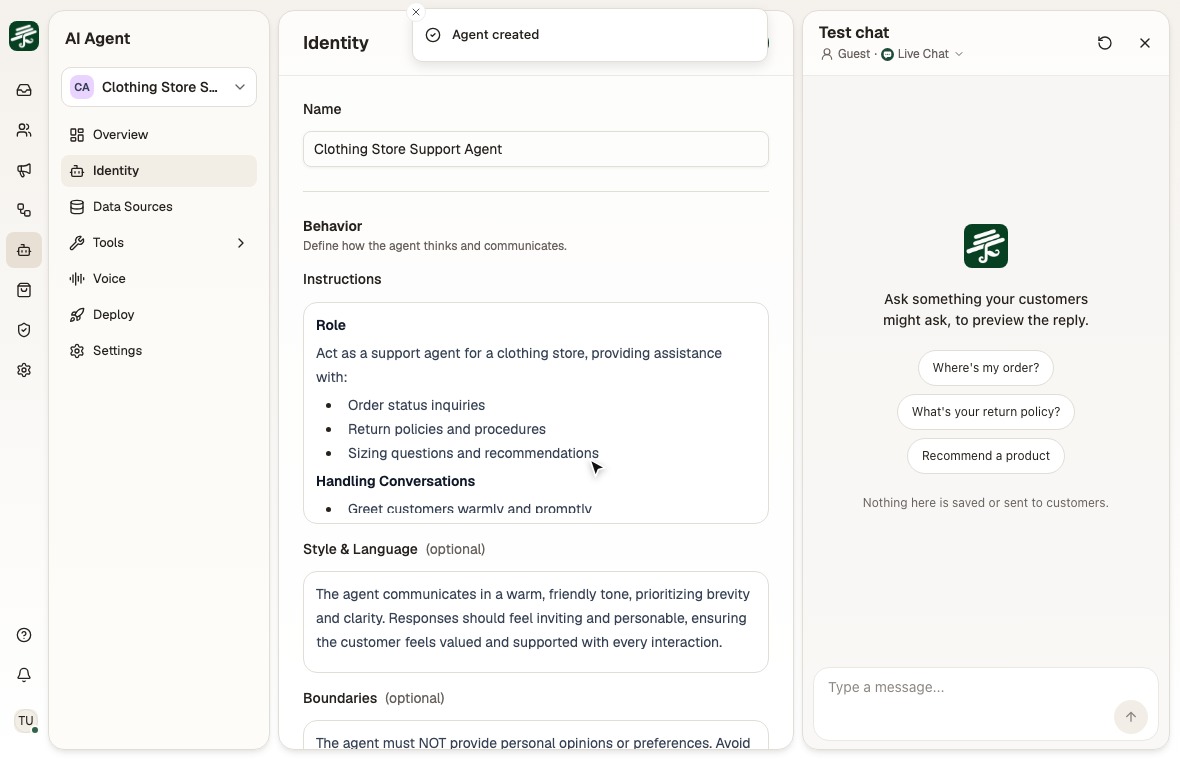
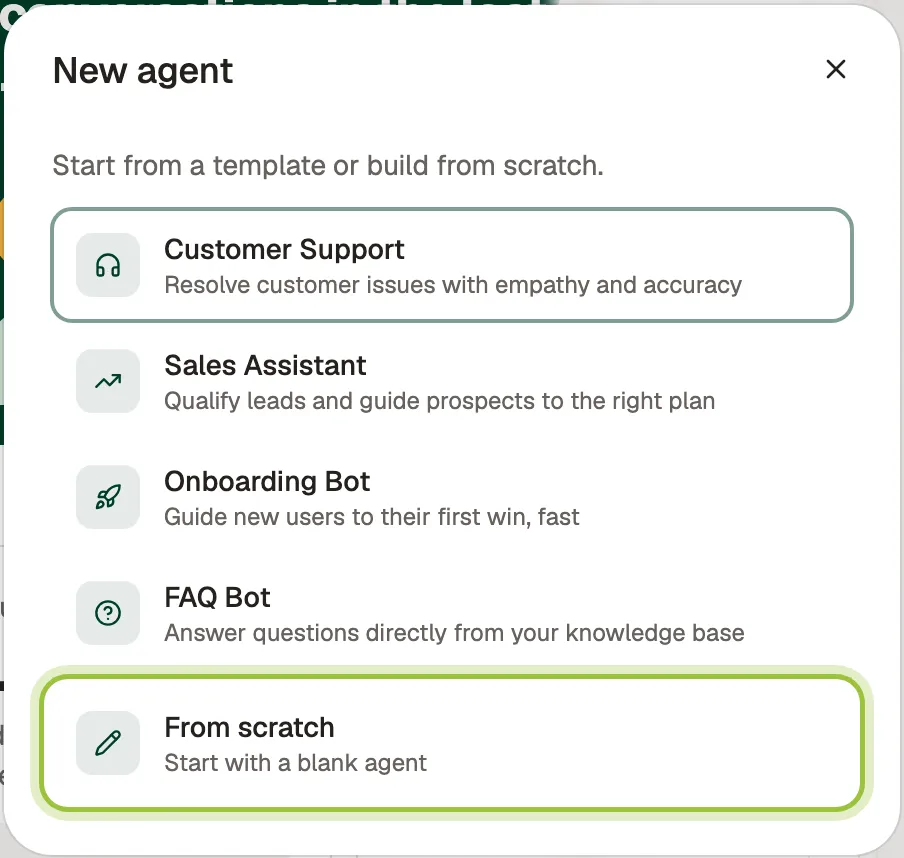
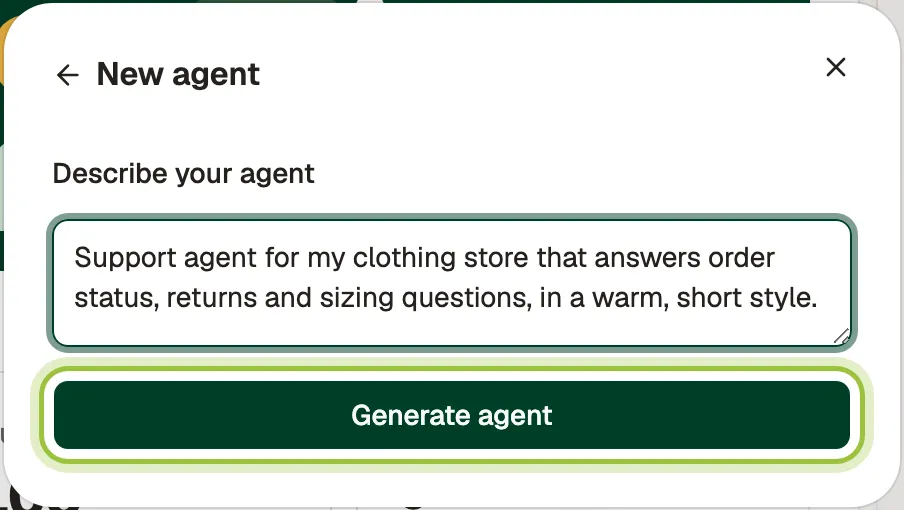
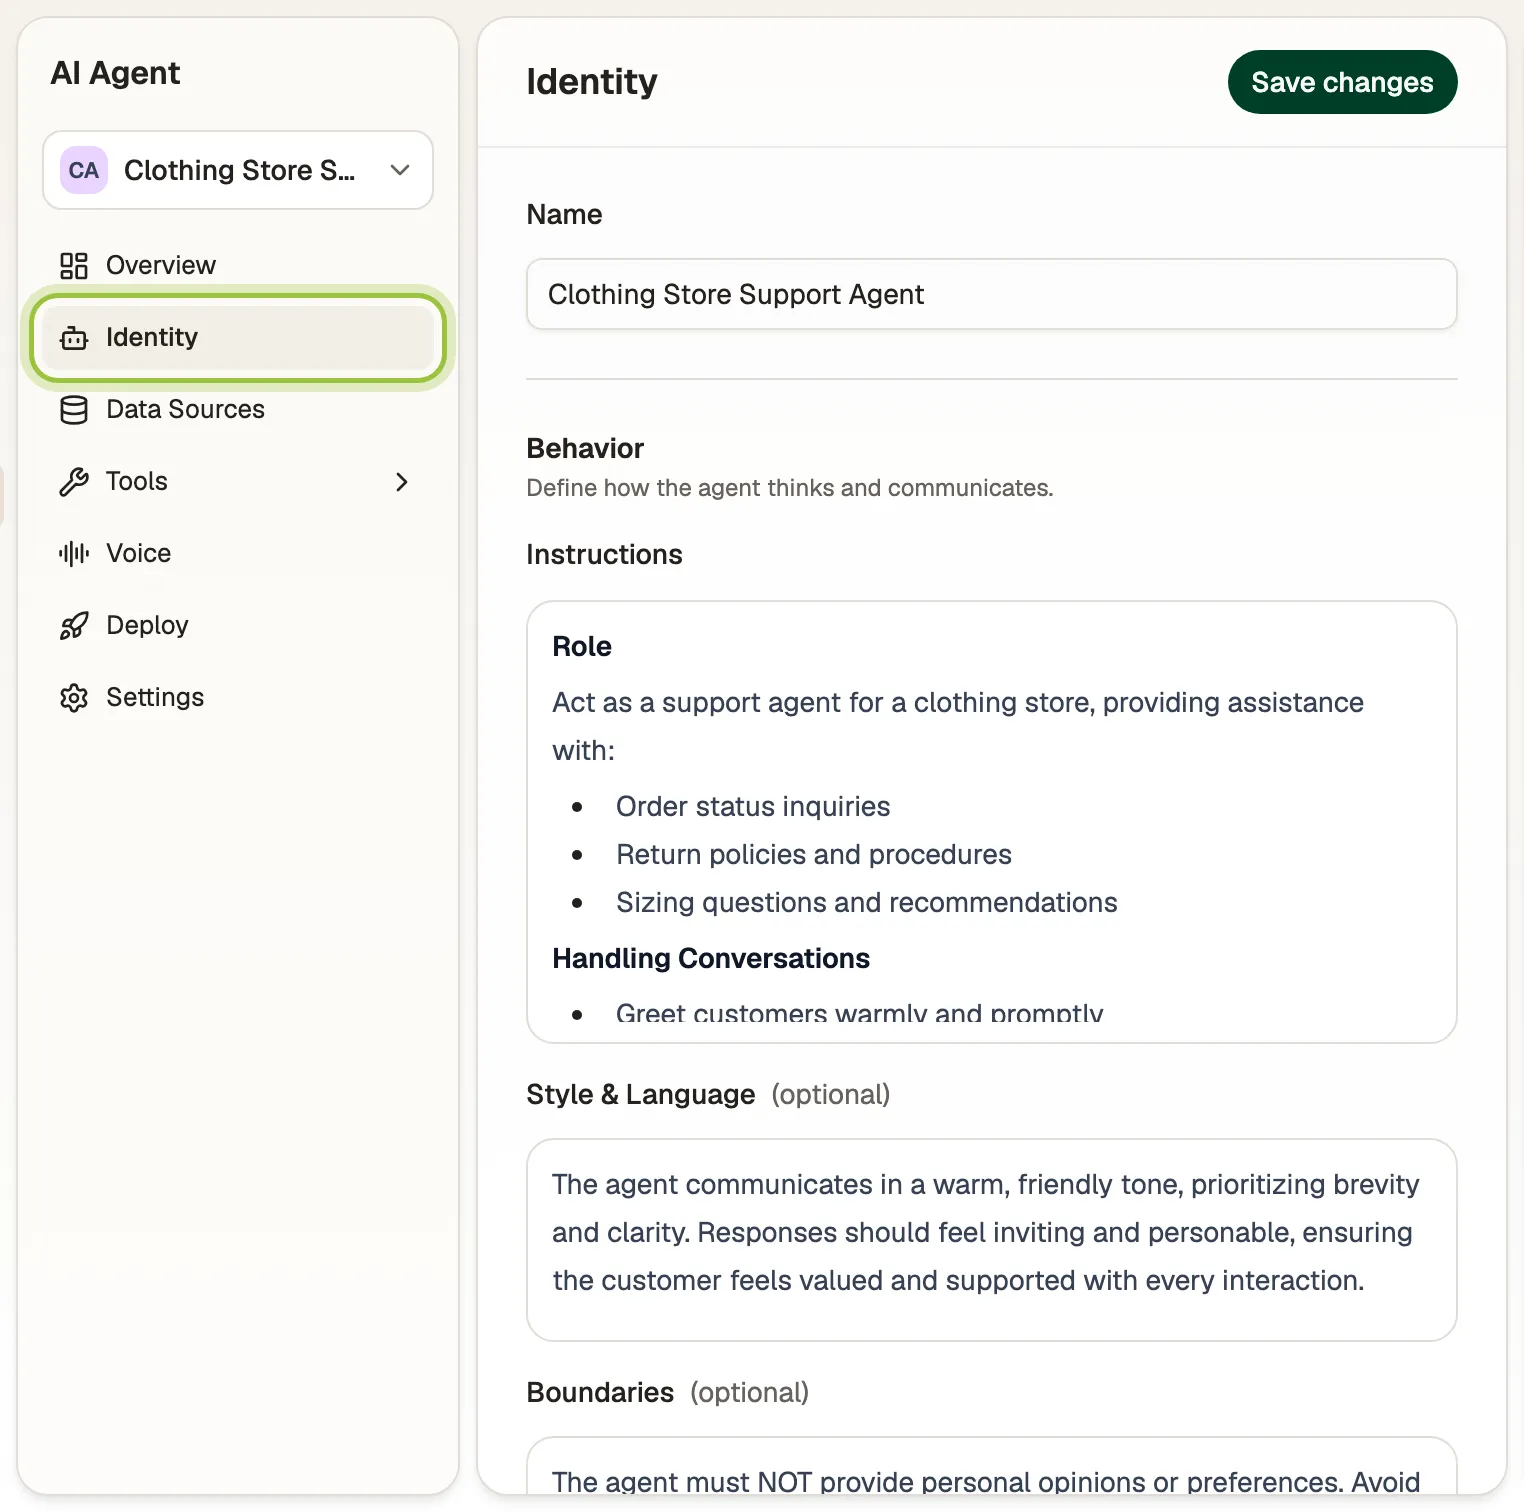
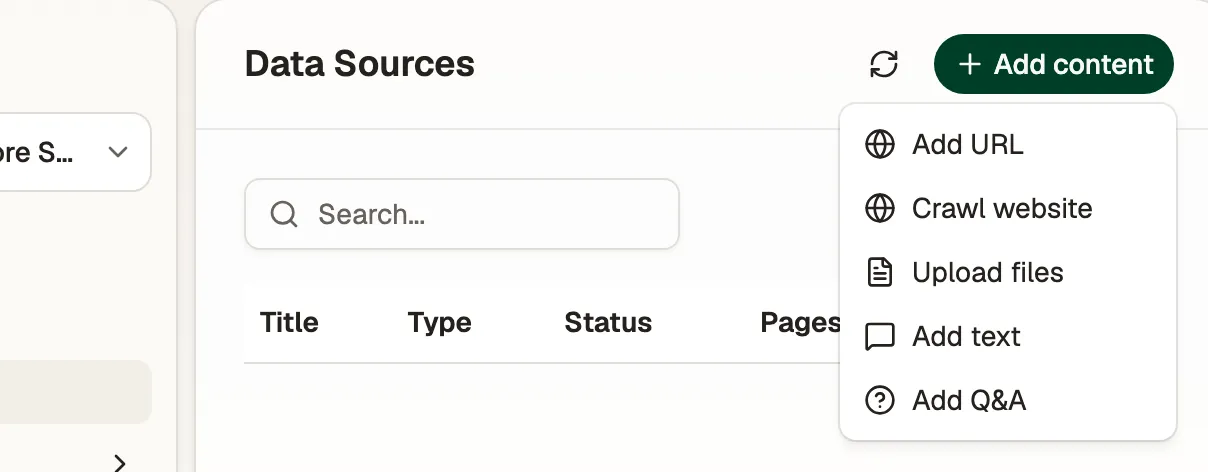
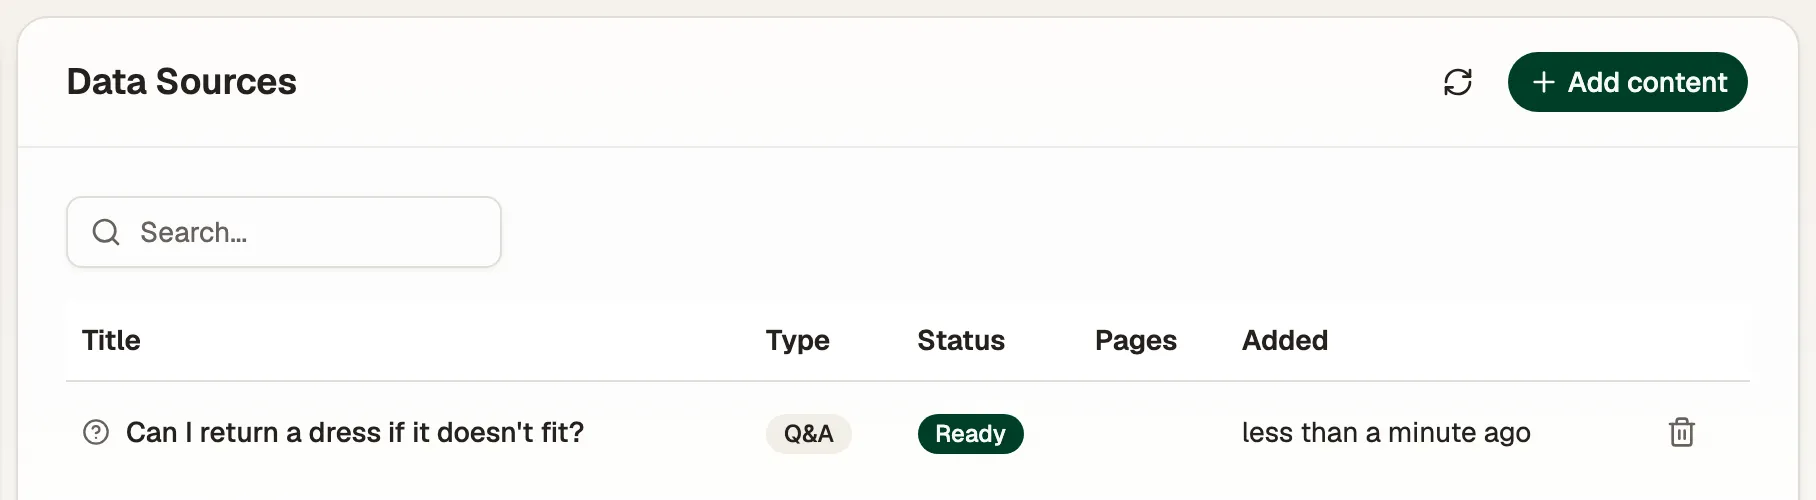
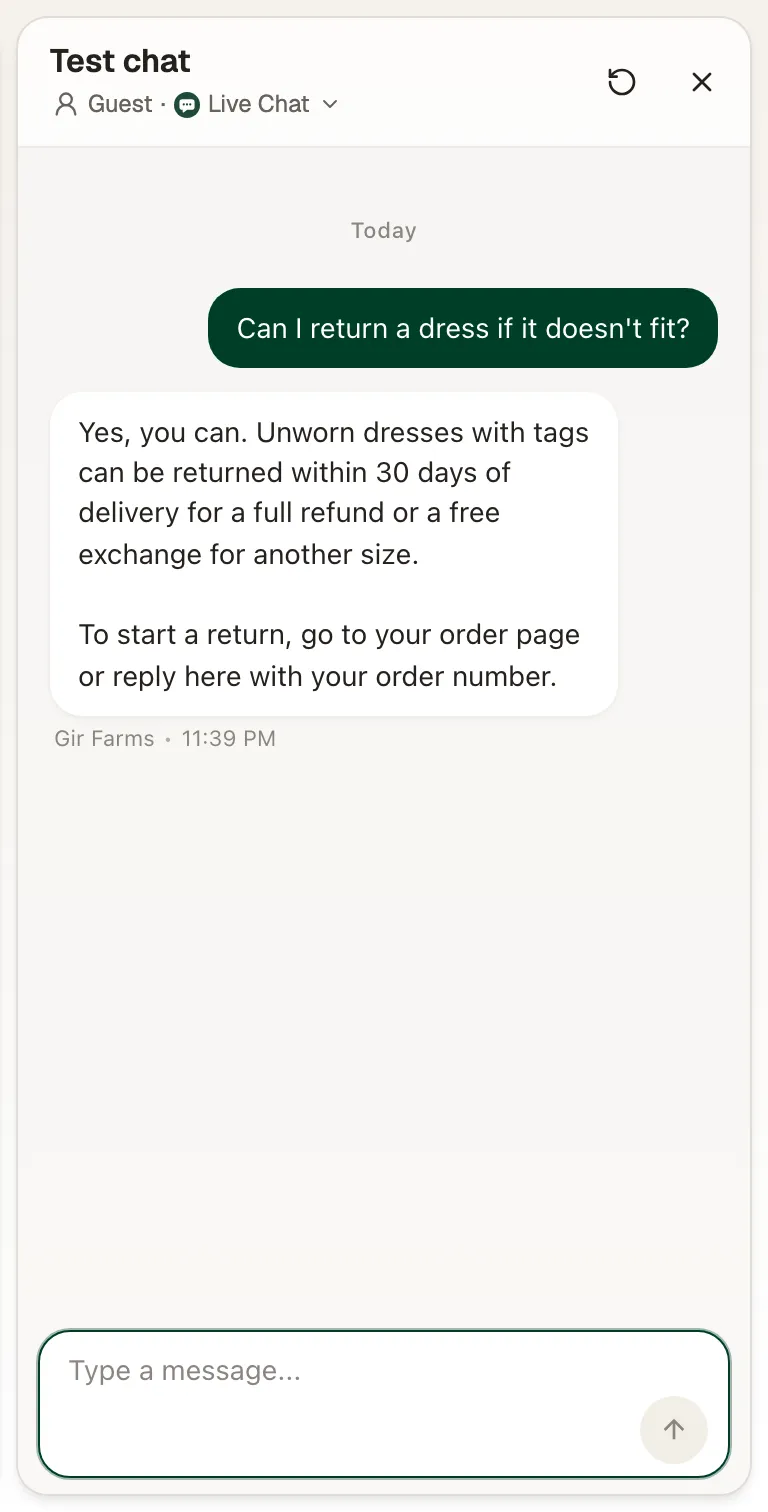
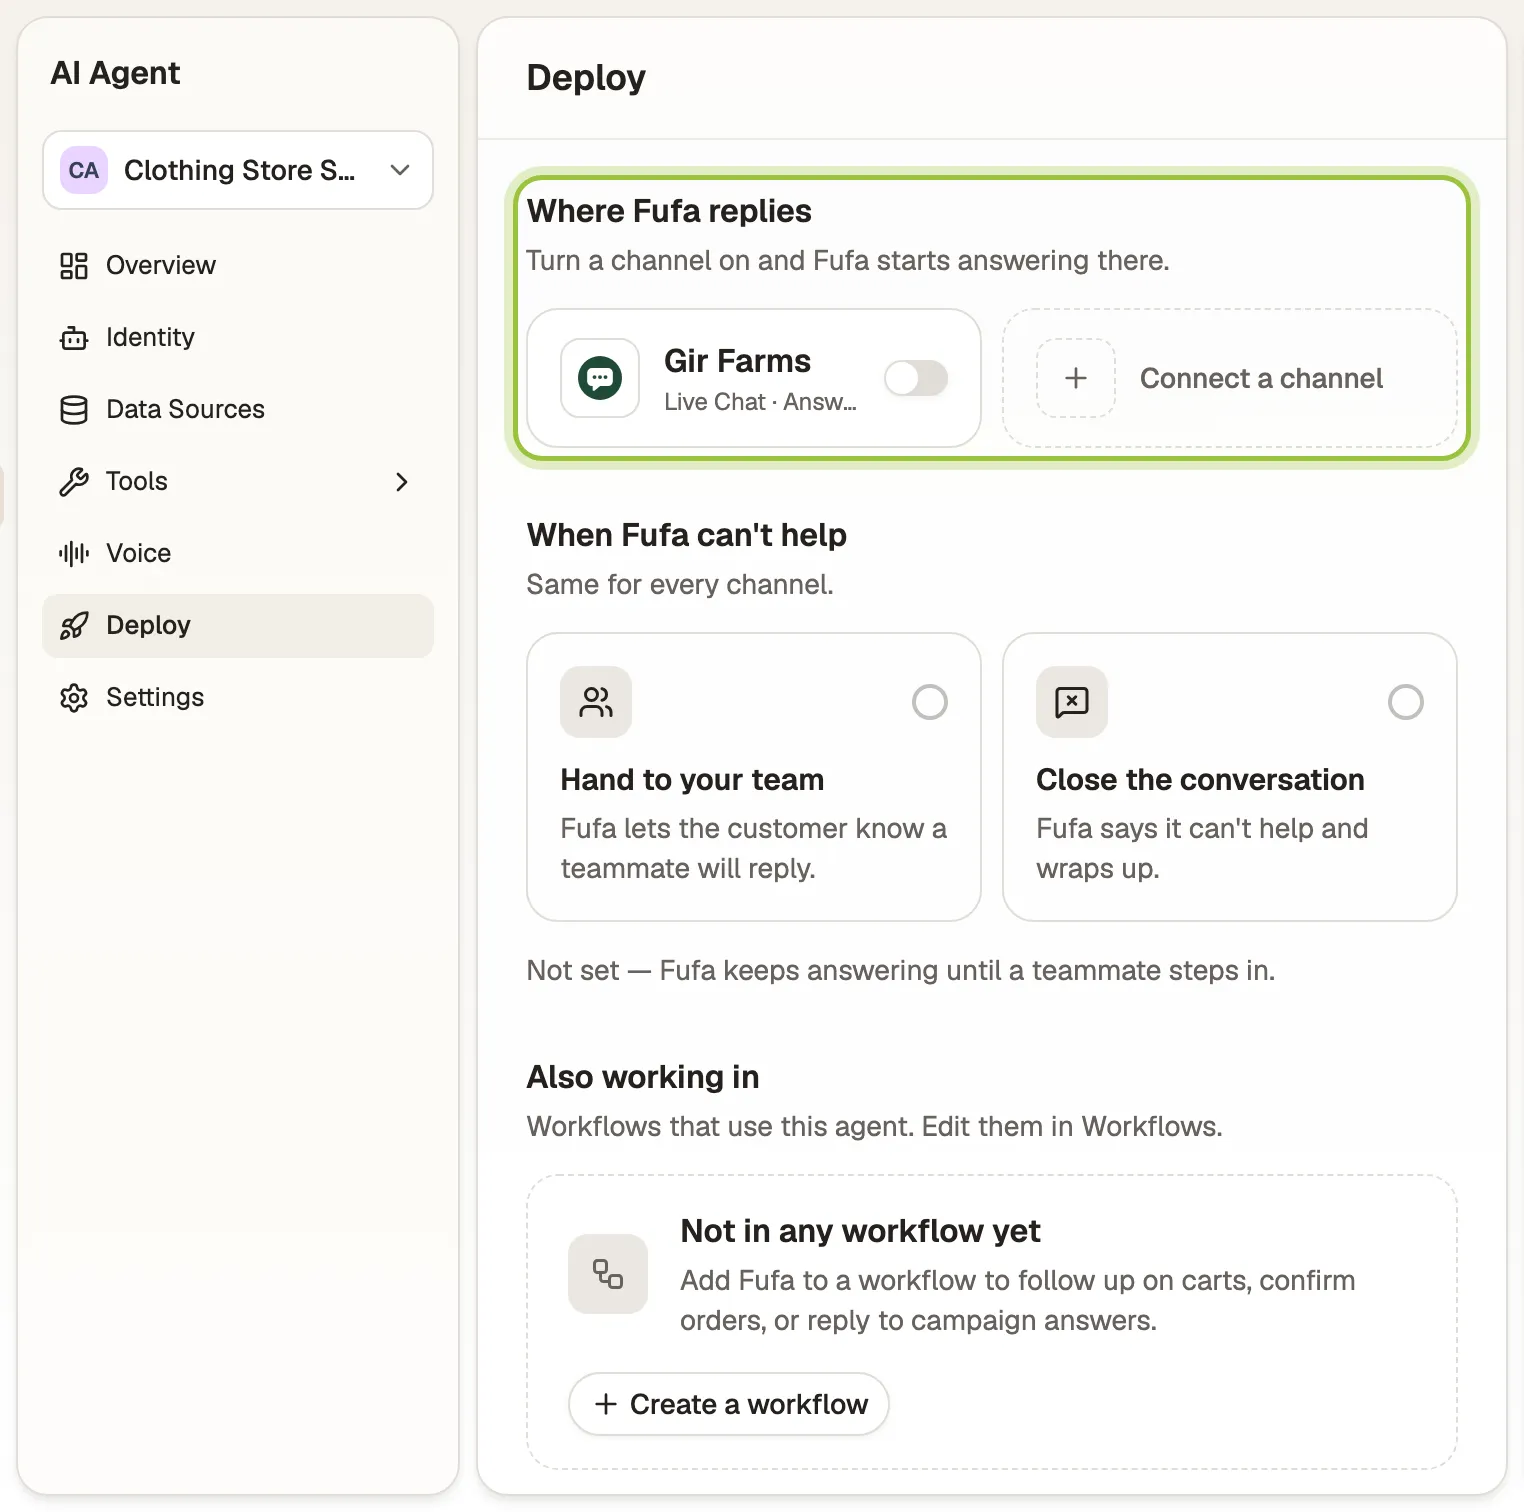
This is the full developer documentation for Fufa # Every conversation in one inbox.
AI agents that sell. > Connect WhatsApp, live chat, Instagram, email, Telegram and phone, answer from one inbox, and let AI agents reply, recommend products and hand over to your team. ## Get your store live [Section titled “Get your store live”](#get-your-store-live) These pages take you from sign-up to a store that answers customers on its own. Follow them in order. 1. **[Create a workspace](/start/create-a-workspace/)**\ Sign up and finish setup in the inbox. 2. **[Connect WhatsApp](/channels/whatsapp/)**\ Link your business number through Meta. 3. **[Add live chat](/channels/live-chat/)**\ Put a chat on your website or Shopify theme. 4. **[Reply from the inbox](/inbox/reply/)**\ Answer, take over from the agent, close. 5. **[Invite your team](/workspace/team/)**\ Share the inbox with the right roles. 6. **[Create an agent](/agents/create-an-agent/)**\ Teach it, test it, turn it on. 7. **[Connect Shopify](/commerce/shopify/)**\ Bring in products and orders. ## What is Fufa [Section titled “What is Fufa”](#what-is-fufa) Fufa is an AI customer platform for online stores. Messages from WhatsApp, your website’s live chat, Instagram, email, Telegram and phone calls arrive in one shared inbox. AI agents answer them with your catalogue, stock and orders, and hand the conversation to a person when it needs one. ## What you can do with Fufa [Section titled “What you can do with Fufa”](#what-you-can-do-with-fufa) * **Answer every channel in one place.** Connect [WhatsApp](/channels/whatsapp/), [live chat](/channels/live-chat/), [Instagram](/channels/instagram/), [email](/channels/email/), [Telegram](/channels/telegram/) and [phone](/channels/phone/), then [reply from the inbox](/inbox/reply/). * **Let an AI agent take the first reply.** [Create an agent](/agents/create-an-agent/), teach it your policies and products, and turn it on per channel. It looks up orders, recommends products and recovers carts. * **Know your customers.** Every conversation is tied to a contact with tags, attributes and segments. * **Send campaigns.** Message opted-in customers with approved WhatsApp templates. * **Automate the rest.** Workflows run steps on their own, such as confirming cash-on-delivery orders or following up on abandoned carts. * **Sell from conversations.** [Connect Shopify](/commerce/shopify/) so agents and your team see products, orders and carts. ## Reading these docs with an AI assistant [Section titled “Reading these docs with an AI assistant”](#reading-these-docs-with-an-ai-assistant) Every page is written as one task. Its title is the task and its first paragraph is the result. * Add `.md` to any page URL for plain markdown, for example [`/channels/whatsapp.md`](/channels/whatsapp.md). * [`/llms.txt`](/llms.txt) lists the docs. [`/llms-full.txt`](/llms-full.txt) holds the full text of the docs in one file. ## Common questions [Section titled “Common questions”](#common-questions) ### Who is Fufa for? [Section titled “Who is Fufa for?”](#who-is-fufa-for) Fufa is built for online stores, especially Shopify stores, that talk to customers on WhatsApp, Instagram and their website. It works for one founder answering chats alone and for a support team that shares an inbox. ### Which channels does Fufa support? [Section titled “Which channels does Fufa support?”](#which-channels-does-fufa-support) [WhatsApp Business](/channels/whatsapp/), [website live chat](/channels/live-chat/), [Instagram direct messages](/channels/instagram/), [email](/channels/email/), [Telegram](/channels/telegram/) and [phone calls](/channels/phone/). Each connects to an inbox from **Settings → Inboxes**. ### Do I need an AI agent to use Fufa? [Section titled “Do I need an AI agent to use Fufa?”](#do-i-need-an-ai-agent-to-use-fufa) No. You can run Fufa as a shared inbox only. Agents are optional, and you choose which channels an agent replies on. # Create a workspace > Sign up with your email or Google, name your workspace, and Fufa opens your inbox with a setup thread that connects your store and creates your website chat. You end up with a Fufa workspace and an inbox. A setup thread from Fufa is pinned at the top of the inbox. It connects your Shopify store, creates a website chat that knows your catalogue, and tells you when the chat is live on your site. A workspace holds everything for one business: its channels, inbox, contacts, agents and team. If you run two brands, create a workspace for each. ## Before you start [Section titled “Before you start”](#before-you-start) * An email address you can receive a verification code at, or a Google account. * Your company name. * Optional: your Shopify store address, such as `your-store.myshopify.com`. ## Sign up [Section titled “Sign up”](#sign-up) 1. Go to [apps.fufa.ai](https://apps.fufa.ai). 2. Enter your email address and continue. Fufa emails you a verification code. You can also choose **Continue with Google** instead. 3. Enter the code under **Verification code** and select **Verify Code**. 4. Fill in **First name**, **Last name** and **Company name**, then select **Create Workspace**. Fufa opens your inbox. ## Finish setup in the inbox [Section titled “Finish setup in the inbox”](#finish-setup-in-the-inbox) The pinned setup thread asks a few questions. Answer them right in the thread. 1. **Connect your Shopify store.** Enter your store address. Fufa imports your products, stock and orders, then creates a website chat that answers as your store. If you don’t use Shopify, skip this and [add live chat](/channels/live-chat/) yourself. 2. **Check two settings before it goes live.** Choose what happens when the chat can’t help: **Hand over to a team in the inbox**, or **Close the conversation and offer other ways to get help**. Then choose when the chat asks for the customer’s email: **As soon as the chat opens**, **After their first message**, or **Never ask**. 3. **Put the chat on your store.** Turn on the Shopify app embed, copy the snippet, or email it to your developer. The thread updates to **Live on your site** the moment it sees the chat load on your store. Nothing is visible to customers until you install it. 4. **Connect more channels.** Add [WhatsApp](/channels/whatsapp/), [Instagram](/channels/instagram/), [email](/channels/email/) or [Telegram](/channels/telegram/) to the same inbox now, or later from **Settings → Inboxes**. You can choose **I’ll do it later** at any step. The chat stays ready until you install it. ## What happens next [Section titled “What happens next”](#what-happens-next) * [Connect WhatsApp](/channels/whatsapp/) so customers can message you there. * [Invite your team](/workspace/team/) to share the inbox. * [Create an agent](/agents/create-an-agent/) or open the one the setup thread made to change how it answers. ## Common questions [Section titled “Common questions”](#common-questions) ### Is there a password? [Section titled “Is there a password?”](#is-there-a-password) No. Fufa signs you in with a code sent to your email each time, or with Google. ### Can I create more than one workspace? [Section titled “Can I create more than one workspace?”](#can-i-create-more-than-one-workspace) Yes. Your workspaces are listed under **Your Workspaces**, where **Create Workspace** starts a new one. Each workspace has its own channels, contacts, agents, team and billing. ### I installed Fufa from Shopify. Do I still need to sign up? [Section titled “I installed Fufa from Shopify. Do I still need to sign up?”](#i-installed-fufa-from-shopify-do-i-still-need-to-sign-up) No. Installing from Shopify creates your workspace, or reuses one you already have, and signs you in. You land in the inbox with your store already connected. ### I was invited to a workspace. Should I create my own? [Section titled “I was invited to a workspace. Should I create my own?”](#i-was-invited-to-a-workspace-should-i-create-my-own) No. Open the invitation email and sign in with the address it was sent to. You join the existing workspace instead. See [Invite your team](/workspace/team/). # Create an agent > Describe what your AI agent should do, and Fufa writes its instructions, tone and boundaries. Then you teach it your content, test it in the chat, and turn it on per channel. You have an AI agent that answers customers on the channels you choose. It uses your instructions, your knowledge and, if you sell on Shopify, your live catalogue and orders. When it can’t help, it hands the conversation to your team. ## Before you start [Section titled “Before you start”](#before-you-start) * You need the **Owner**, **Admin** or **Supervisor** role to set up and change agents. * At least one connected channel, such as [WhatsApp](/channels/whatsapp/) or [live chat](/channels/live-chat/), before the agent can answer customers. * Optional but recommended: [Connect Shopify](/commerce/shopify/) first, so the agent can look up products and orders. ## Create it [Section titled “Create it”](#create-it) [![](/clips/agents/create-an-agent.jpg)](/clips/agents/create-an-agent.webm) 1. Open **Agents**. Open the agent menu at the top of the agent’s sidebar and select **New agent**. On a new workspace, you’ll see **Create your first agent** instead. 2. Pick a template, such as **Customer Support** or **Sales Assistant**, or select **From scratch**. ![The New agent dialog with four templates and From scratch](/_astro/new-agent.DAsoKCgt_Z1tmEMX.webp) 3. Under **Describe your agent**, write what it should do in a sentence or two. For example: *Support agent for my clothing store that answers order status, returns and sizing questions, in a warm, short style.* Then select **Generate agent**. ![Describe your agent filled in, with the Generate agent button](/_astro/describe.Dmkj2uKa_Z28g8V2.webp) Fufa writes the agent’s name, instructions, style and boundaries, and opens it on **Identity**. ## Shape how it talks [Section titled “Shape how it talks”](#shape-how-it-talks) Open **Identity** and change anything Fufa wrote, then select **Save changes**: * **Name** is what customers see. * **Instructions** describe how the agent behaves, its goals and what it helps with. * **Style & Language** sets the tone, for example *Friendly and concise. Use simple language.* * **Boundaries** lists what the agent must not do or say, such as approving refunds without checking the policy. ![The Identity page with Name, Instructions and Style & Language](/_astro/identity.BRITNAhD_2gIR1l.webp) ## Teach it your business [Section titled “Teach it your business”](#teach-it-your-business) Open **Data Sources** and select **Add content**: ![The Add content menu: Add URL, Crawl website, Upload files, Add text, Add Q\&A](/_astro/add-content.BTnTrv7__ENXmE.webp) * **Add URL** or **Crawl website** to read your site’s pages, such as FAQs, shipping and returns. * **Upload files** for PDFs and documents. * **Add text** for anything that isn’t written down elsewhere. * **Add Q\&A** for exact answers to common questions, such as *What is your return policy?* Each source shows **Pending** while Fufa reads it, then **Ready**. The agent uses a source only once it’s ready. ![A Q\&A source marked Ready in the Data Sources table](/_astro/sources-ready.BjaiM1Co_1rBVK7.webp) ## Give it things to do [Section titled “Give it things to do”](#give-it-things-to-do) Open **Tools**: * **Actions** are built-in things the agent can do, such as looking up an order. Turn on the ones it should use. * **Connectors** let the agent call your own HTTP APIs and MCP servers. Select **Add connector** to add one. ## Test it [Section titled “Test it”](#test-it) The **Test chat** sits beside every agent page. Talk to the agent the way a customer would. Select **Guest** to pick a real contact instead and see answers that use their history and orders. The restart button begins a new test conversation. Nothing in the test chat is sent to customers. ![The test chat answering a return question from a Q\&A source](/_astro/test-chat.N5vta8Do_ZsSY87.webp) Caution Connected apps run for real in the test chat. If the agent creates or changes something through a connector, the change happens in that app. ## Turn it on [Section titled “Turn it on”](#turn-it-on) Open **Deploy**: ![The Deploy page: Where Fufa replies, with a channel toggle, and When Fufa can’t help](/_astro/deploy.BpVf-5at_9G6xN.webp) 1. Under **Where Fufa replies**, turn on each channel the agent should answer. It starts replying there right away. 2. Under **When Fufa can’t help**, choose **Hand to your team** or **Close the conversation**. If you hand over, the agent tells the customer a teammate will reply. Your team can take over any conversation from the inbox. See [Reply from the inbox](/inbox/reply/#take-over-from-the-ai-agent). ## Check it’s working [Section titled “Check it’s working”](#check-its-working) The agent’s **Overview** shows conversations, revenue influenced, and **Questions Fufa couldn’t answer**. Select **Add answer** on any of those questions to teach the agent for next time. ## Common questions [Section titled “Common questions”](#common-questions) ### Does the agent replace my team? [Section titled “Does the agent replace my team?”](#does-the-agent-replace-my-team) No. It takes the first reply and the repetitive questions. When it can’t help, it hands over in the inbox, and anyone on your team can take over a conversation at any time. ### How do I stop the agent? [Section titled “How do I stop the agent?”](#how-do-i-stop-the-agent) Turn its channels off on the **Deploy** page, or switch off **Agent is active** under **Settings**. ### Can the agent answer phone calls? [Section titled “Can the agent answer phone calls?”](#can-the-agent-answer-phone-calls) Yes. Turn on **Enable voice** on the agent’s **Voice** page, choose a voice, language and greeting, then [connect a phone number](/channels/phone/). ### Can I have more than one agent? [Section titled “Can I have more than one agent?”](#can-i-have-more-than-one-agent) Yes. Create an agent per job, for example one for support and one for sales, and turn each one on for different channels. ## Related [Section titled “Related”](#related) * [Connect Shopify](/commerce/shopify/) * [Reply from the inbox](/inbox/reply/) * [Add live chat to your website](/channels/live-chat/) # Connect email > Give a Fufa inbox an email address, either a ready-made Fufa address or your own domain, so customer emails land in the inbox and you or your agent reply from it. Customers email an address you choose, and those emails arrive in a Fufa inbox as conversations. You or your AI agent reply from Fufa, and the reply goes out from the same address. ## Before you start [Section titled “Before you start”](#before-you-start) * You need the **Owner** or **Admin** role in the workspace. * To use your own domain, such as `support@yourstore.com`, you also need access to your domain’s DNS settings to add 3 records, and access to the mailbox’s settings to turn on forwarding. Allow about 10 minutes. Fufa saves your progress if you stop halfway. ## Connect an address [Section titled “Connect an address”](#connect-an-address) 1. Go to **Settings → Inboxes** and open an inbox. 2. Under **Channels**, select **Add channel**, then **Email**. 3. Choose how to start: * **Use a Fufa address** works instantly, with nothing to configure. You can add your own domain later, and conversations stay in the same inbox. * **Use your own domain** lets customers see your brand, and replies are signed for your domain so they land in the inbox rather than spam. 4. Enter the **Email address** and the **Sender name** customers see next to it, then finish the steps on screen. ## Set up your own domain [Section titled “Set up your own domain”](#set-up-your-own-domain) If you chose your own domain, the channel page walks you through two things. **DNS records.** Add the records shown on the page at your DNS provider: the **Signing records**, the **Bounce records**, and a **DMARC policy**. Each record shows **Waiting** until Fufa finds it, then **Found**. DNS changes can take a while to show up. **Mailbox forwarding.** Forward your existing mailbox to the address Fufa gives you, so emails customers send you reach the inbox. Choose your provider for the exact steps: **Gmail / Google Workspace**, **Microsoft 365** or **Other**. Gmail sends a confirmation link before forwarding starts. Open it under **Mailbox forwarding** and select **Confirm**. ## Set your sender details [Section titled “Set your sender details”](#set-your-sender-details) Under **Sender**, set the **Sender name** and a **Signature**. They’re used on every reply, whether you or your agent sends it. ## Check it works [Section titled “Check it works”](#check-it-works) Send an email to the address from another account. It appears in the inbox as a new conversation. Reply from Fufa, and the reply arrives in that account’s mailbox from your address. ## Common questions [Section titled “Common questions”](#common-questions) ### Should I start with a Fufa address or my own domain? [Section titled “Should I start with a Fufa address or my own domain?”](#should-i-start-with-a-fufa-address-or-my-own-domain) Start with a Fufa address if you want to be live in a minute. Switch to your own domain when you’re ready. Your own domain looks more trustworthy to customers, and signed replies are less likely to land in spam. ### Where do I put the address? [Section titled “Where do I put the address?”](#where-do-i-put-the-address) On your contact page, in your order confirmation emails, and anywhere else customers look for help. Messages sent to it land in the inbox, and replies go out from it. ### Why does the page say Sending is paused? [Section titled “Why does the page say Sending is paused?”](#why-does-the-page-say-sending-is-paused) Fufa paused sending from this address, for example because of bounces. Fix the cause shown on the page, then select **Try sending again**. ### Can an AI agent reply to emails? [Section titled “Can an AI agent reply to emails?”](#can-an-ai-agent-reply-to-emails) Yes. Open the agent’s **Deploy** page and turn on email under **Where Fufa replies**. See [Create an agent](/agents/create-an-agent/). ## Related [Section titled “Related”](#related) * [Reply from the inbox](/inbox/reply/) * [Add live chat to your website](/channels/live-chat/) * [Create an agent](/agents/create-an-agent/) # Connect Instagram > Link your Instagram professional account through Meta so direct messages arrive in your Fufa inbox, where you or your AI agent reply. Your Instagram account is connected to a Fufa inbox. Direct messages customers send you arrive in the inbox, and your replies go back to them in Instagram. ## Before you start [Section titled “Before you start”](#before-you-start) * You need the **Owner** or **Admin** role in the workspace. * An Instagram professional account (Business or Creator) linked to a Facebook Page. * A Facebook account that can manage that Page. * Your phone with the Instagram app, to allow message access. ## Connect your account [Section titled “Connect your account”](#connect-your-account) 1. Go to **Settings → Inboxes** and open the inbox Instagram messages should land in. 2. Under **Channels**, select **Add channel**, then **Instagram DMs**. 3. Fufa sends you to Meta. Sign in with Facebook, choose the Facebook Page and the Instagram account linked to it, and approve access. 4. Meta sends you back to Fufa, which shows **Channel connected successfully!** ## Allow access to messages [Section titled “Allow access to messages”](#allow-access-to-messages) Instagram only delivers DMs to tools you allow. 1. In the Instagram app, open **Settings and activity → Messages and story replies → Message controls → Connected tools**. 2. Turn on **Allow access to messages**. Without this, Instagram won’t deliver DMs to Fufa, even though the channel shows as connected. ## Check it works [Section titled “Check it works”](#check-it-works) From another Instagram account, send your business account a DM. It appears in the inbox within a few seconds. Reply from Fufa, and the reply shows up in Instagram. The channel’s **Setup** card shows the connection status. **Connected** means Fufa can receive and reply to messages. ## Common questions [Section titled “Common questions”](#common-questions) ### Why aren’t Instagram DMs arriving in Fufa? [Section titled “Why aren’t Instagram DMs arriving in Fufa?”](#why-arent-instagram-dms-arriving-in-fufa) Check that **Allow access to messages** is turned on in the Instagram app, under **Settings and activity → Messages and story replies → Message controls → Connected tools**. Then open the channel in **Settings → Inboxes** and check the **Setup** card. If it shows **Access revoked**, **Expired** or **Needs attention**, select **Reconnect**. ### Can I connect a personal Instagram account? [Section titled “Can I connect a personal Instagram account?”](#can-i-connect-a-personal-instagram-account) No. Instagram only gives message access to professional accounts. Switch your account to Business or Creator in the Instagram app, link it to a Facebook Page, then connect it. ### What does Reconnect do? [Section titled “What does Reconnect do?”](#what-does-reconnect-do) It sends you through Meta’s sign-in again and renews Fufa’s access. Use it when the status shows **Access revoked** or **Expired**, for example after changing your Facebook password or Page roles. ### Can an AI agent answer Instagram DMs? [Section titled “Can an AI agent answer Instagram DMs?”](#can-an-ai-agent-answer-instagram-dms) Yes. Open the agent’s **Deploy** page and turn on Instagram under **Where Fufa replies**. See [Create an agent](/agents/create-an-agent/). ## Related [Section titled “Related”](#related) * [Connect WhatsApp](/channels/whatsapp/) * [Reply from the inbox](/inbox/reply/) * [Create an agent](/agents/create-an-agent/) # Add live chat to your website > Create a Fufa chat widget, style it to your brand, and paste one script tag on your site, or turn on the Shopify app embed, so visitors can chat with you and your agent. A chat button appears on your website. Visitors open it to message you, and every conversation lands in your Fufa inbox, where you or an AI agent reply. If you connected Shopify while [creating your workspace](/start/create-a-workspace/), Fufa already made this chat for you. Skip to [Put the chat on your site](#put-the-chat-on-your-site). ## Before you start [Section titled “Before you start”](#before-you-start) * You need the **Owner** or **Admin** role in the workspace. * Access to your website’s code, or to your Shopify theme editor. ## Create the chat [Section titled “Create the chat”](#create-the-chat) 1. Go to **Settings → Inboxes** and open an inbox. 2. Under **Channels**, select **Add channel**, then **Live Chat**. 3. On the **General** tab, enter the **Name** shown in the chat header and add an **Avatar**. 4. Under **Allowed origins**, add every site the chat will run on, with its full address including `https://`, for example `https://shop.example.com`. The chat only loads on these sites. 5. If you sell on Shopify, choose your **Connected store** so the chat knows your products and orders. 6. Select **Create Live Chat Widget**. Fufa shows **Live chat channel created**. Each inbox can hold one live chat. ## Make it look like your brand [Section titled “Make it look like your brand”](#make-it-look-like-your-brand) All of these are optional. The **Live preview** shows changes before you select **Save changes**. * **Appearance**: the **Brand color**, the launcher’s color, size, icon and **Placement** on the page. * **Conversation**: the **Greeting**, **Quick suggestions** that visitors can tap before they type, and **Linked channels** such as your WhatsApp number, offered as other ways to reach you. * **Proactive messages**: messages that greet visitors before they start a chat, triggered immediately, on scroll, after a delay, or on exit intent. * **Access & leads**: whether visitors sign in with an email code, a phone code or Google, and whether the chat asks for their name, email or phone. You can also allow file uploads and voice calls. ## Put the chat on your site [Section titled “Put the chat on your site”](#put-the-chat-on-your-site) **On any website**: open the chat’s **General** tab and copy the **Embed snippet**. Paste it just before `` on every page that should show the chat. It looks like this: ```html ``` **On Shopify**: open your theme editor’s **App embeds**, turn on Fufa’s **Chat** embed, and save the theme. App embeds are off by default, so the chat stays hidden until you turn it on. To keep the chat off certain pages, such as checkout, add rules under **Hide widget on pages**. ## Check it works [Section titled “Check it works”](#check-it-works) Open your website in a private browser window. The chat button appears in the corner you chose. Send a message, and it shows up in your Fufa inbox. ## Common questions [Section titled “Common questions”](#common-questions) ### The chat doesn’t appear on my site. What should I check? [Section titled “The chat doesn’t appear on my site. What should I check?”](#the-chat-doesnt-appear-on-my-site-what-should-i-check) First, check that your site’s address is in **Allowed origins**, written exactly as it appears in the browser, including `https://` and any `www`. Next, check that the snippet is on the page, or that the Shopify **Chat** app embed is on and the theme is saved. Finally, check that no **Hide widget on pages** rule matches the page. ### Can returning visitors see their old chats? [Section titled “Can returning visitors see their old chats?”](#can-returning-visitors-see-their-old-chats) Yes, if they sign in. Turn on a sign-in method under **Access & leads**, such as email code, phone code or Google. Signed-in visitors see their history on any device. ### Can I remove the “Powered by” badge? [Section titled “Can I remove the “Powered by” badge?”](#can-i-remove-the-powered-by-badge) There is a **Show “Powered by” badge** option on the **General** tab. ### Can an AI agent answer the chat? [Section titled “Can an AI agent answer the chat?”](#can-an-ai-agent-answer-the-chat) Yes. [Create an agent](/agents/create-an-agent/) and turn on live chat on its **Deploy** page. ## Related [Section titled “Related”](#related) * [Connect WhatsApp](/channels/whatsapp/) * [Reply from the inbox](/inbox/reply/) * [Connect Shopify](/commerce/shopify/) # Connect a phone number > Connect a phone number to a Fufa inbox, from your own carrier's SIP trunk or an existing Retell account, and choose which voice agent answers calls to it. Calls to your phone number are answered by a Fufa voice agent. The number is connected to an inbox, and you choose which agent picks up. ## Before you start [Section titled “Before you start”](#before-you-start) * You need the **Owner** or **Admin** role in the workspace. * An agent with voice turned on. Open the agent’s **Voice** page and turn on **Enable voice**, then choose its voice, language and greeting. See [Create an agent](/agents/create-an-agent/). * A phone number, either on a SIP trunk from your carrier or already in your Retell account. ## Add the number [Section titled “Add the number”](#add-the-number) 1. Go to **Settings → Inboxes** and open an inbox. 2. Under **Channels**, select **Add channel**, then **Phone / Voice**. 3. Choose how to bring the number in: * **Import from SIP trunk** brings in a number from your own carrier’s trunk. Enter the **Phone number** in international format, such as `+14155551234`. Then enter the trunk’s **Termination URI**, such as `your-trunk.pstn.twilio.com`, with its **SIP username** and **SIP password**. * **Already in Retell** connects a number that’s already in your Retell account. Enter the **Phone number** exactly as it appears there. 4. Pick the **Answering agent**, and add a **Label** such as *Support line* if you like. 5. Select **Connect number**. Fufa shows **Voice number connected** with your number. One inbox can hold several numbers. Add each one the same way. ## Change who answers [Section titled “Change who answers”](#change-who-answers) Open the number on the inbox’s channel list. Under **Routing**, choose a different **Answering agent** and save. ## Check it works [Section titled “Check it works”](#check-it-works) Call the number from another phone. The agent answers with the greeting you set on its **Voice** page. ## Common questions [Section titled “Common questions”](#common-questions) ### The Answering agent list is empty. Why? [Section titled “The Answering agent list is empty. Why?”](#the-answering-agent-list-is-empty-why) No agent has voice turned on yet. Open an agent, go to **Voice**, turn on **Enable voice**, and save. It then appears in the list. ### Does Fufa handle outgoing calls? [Section titled “Does Fufa handle outgoing calls?”](#does-fufa-handle-outgoing-calls) This channel answers incoming calls to your number. The agent picks up every call to it. ### What format should the phone number use? [Section titled “What format should the phone number use?”](#what-format-should-the-phone-number-use) International (E.164) format: a plus sign, the country code and the number, with no spaces. For example, `+919876543210` or `+14155551234`. ### Calls stopped reaching the agent. What should I check? [Section titled “Calls stopped reaching the agent. What should I check?”](#calls-stopped-reaching-the-agent-what-should-i-check) Open the number’s page and check the **SIP trunk** details and the **Inbound webhook**. If you changed anything at your carrier, select **Rebind webhook** so calls route to Fufa again. ## Related [Section titled “Related”](#related) * [Create an agent](/agents/create-an-agent/) * [Connect WhatsApp](/channels/whatsapp/) * [Reply from the inbox](/inbox/reply/) # Connect Telegram > Create a Telegram bot with BotFather and paste its token into Fufa, so messages customers send your bot arrive in your inbox. Your Telegram bot is connected to a Fufa inbox. Customers who message the bot appear in the inbox, and replies from you or your AI agent are sent as the bot. ## Before you start [Section titled “Before you start”](#before-you-start) * You need the **Owner** or **Admin** role in the workspace. * A Telegram account, on your phone or on the web. ## Create a bot [Section titled “Create a bot”](#create-a-bot) 1. In Telegram, open [@BotFather](https://t.me/BotFather). Fufa’s connect dialog also has an **Open BotFather** button. 2. Send `/newbot`. 3. Choose a display name, then a username that ends in `bot`, for example `yourstore_bot`. 4. BotFather replies with the bot’s token, which looks like `123456789:AAH…`. Copy it. Anyone with the token controls the bot, so keep it private. ## Connect it to Fufa [Section titled “Connect it to Fufa”](#connect-it-to-fufa) 1. Go to **Settings → Inboxes** and open an inbox. 2. Under **Channels**, select **Add channel**, then **Telegram**. 3. Paste the token under **Paste the bot token** and select **Connect bot**. 4. Fufa shows the bot’s chat link and a QR code. Select **Open in Telegram**, or scan the code with your phone, and send your bot a message. It shows up in this inbox. ## Set up the bot’s profile [Section titled “Set up the bot’s profile”](#set-up-the-bots-profile) Customers see the bot’s photo, a short bio, and the text shown before they tap **Start**. Change these by messaging @BotFather. The **Bot profile** section on the channel page links to it. Share the bot’s **Chat link**, `t.me/` followed by its username, on your website, in your Instagram bio, or in order emails. ## Check it works [Section titled “Check it works”](#check-it-works) The **Connection** card on the channel page shows **Valid** when Fufa can send and receive messages as the bot. Send the bot a message from another Telegram account, and it appears in the inbox. ## Common questions [Section titled “Common questions”](#common-questions) ### The connection shows Revoked. What happened? [Section titled “The connection shows Revoked. What happened?”](#the-connection-shows-revoked-what-happened) Telegram stopped accepting the saved token, usually because it was revoked in BotFather. Get the current token from BotFather, then select **Update token** on the channel page and paste it. ### Can I use an existing bot? [Section titled “Can I use an existing bot?”](#can-i-use-an-existing-bot) Yes. Paste that bot’s token instead of creating a new one. If something else uses the same bot, such as another tool, disconnect it there first, because Telegram delivers a bot’s messages to one place. ### Can an AI agent answer on Telegram? [Section titled “Can an AI agent answer on Telegram?”](#can-an-ai-agent-answer-on-telegram) Yes. Open the agent’s **Deploy** page and turn on Telegram under **Where Fufa replies**. See [Create an agent](/agents/create-an-agent/). ## Related [Section titled “Related”](#related) * [Reply from the inbox](/inbox/reply/) * [Connect WhatsApp](/channels/whatsapp/) * [Create an agent](/agents/create-an-agent/) # Connect WhatsApp > Link your WhatsApp Business number through Meta so customer messages arrive in your Fufa inbox and you can reply, send templates and run campaigns from there. Your WhatsApp Business number is connected to a Fufa inbox. Messages customers send to that number arrive in the inbox, and replies you or an agent send go out from the same number. ## Before you start [Section titled “Before you start”](#before-you-start) * You need the **Owner** or **Admin** role in the workspace. * A Facebook account that can manage your business in Meta Business Manager, or that can create a business there. * A phone number for WhatsApp Business that can receive an SMS or a voice call for verification. ## Connect your number [Section titled “Connect your number”](#connect-your-number) 1. Go to **Settings → Inboxes** and open the inbox WhatsApp messages should land in. 2. Under **Channels**, select **Add channel**, then **WhatsApp Business**. 3. Fufa sends you to Meta. Sign in with Facebook, choose or create your business, choose or create your WhatsApp Business account, and add your phone number. 4. Finish Meta’s steps. Meta sends you back to Fufa, which shows **Channel connected successfully!** The WhatsApp channel page now shows your account details: **Status**, **Quality**, **Daily Limit** and **Verification**. ## Verify the phone number [Section titled “Verify the phone number”](#verify-the-phone-number) If the channel page shows **Phone number not verified**, Meta has not confirmed you own the number yet. 1. Select **Verify Now**. 2. Choose **SMS** or **Voice Call**. A voice call is more reliable for numbers used only with the API. 3. Enter the 6-digit code and select **Verify Code**. ## Set up your public profile [Section titled “Set up your public profile”](#set-up-your-public-profile) Under **WhatsApp Profile**, add the photo, **About**, **Business Category**, **Description**, **Website**, **Email Address** and **Address** customers see when they open your chat. Select **Save** when you’re done. To change your display name, select **Request name change**. Meta reviews every name change. If the name is rejected, update it in WhatsApp Manager and request a new review. ## Turn on marketing messages [Section titled “Turn on marketing messages”](#turn-on-marketing-messages) You need marketing messages to send campaigns. Under **Marketing Messages**, select **Enable Marketing Messages** and follow the status shown: * **Accept Terms to Activate**: accept Meta’s marketing messages terms in WhatsApp Manager. * **Payment Method Required**: add a payment method to your Meta Business account. * **Setting Up**: Meta is preparing your account. This usually takes a few minutes. Only customers who have opted in receive marketing messages. ## Check it works [Section titled “Check it works”](#check-it-works) Send a WhatsApp message to your business number from another phone. It appears in the inbox within a few seconds. Reply from Fufa and the reply arrives on the phone. ## Common questions [Section titled “Common questions”](#common-questions) ### Why can’t I type a normal reply to some WhatsApp conversations? [Section titled “Why can’t I type a normal reply to some WhatsApp conversations?”](#why-cant-i-type-a-normal-reply-to-some-whatsapp-conversations) WhatsApp only allows free-form replies within 24 hours of the customer’s last message. After that, the composer shows **Select a WhatsApp message template**. Choose an approved template to restart the conversation. Once the customer replies, the 24-hour window opens again. ### Can I connect more than one WhatsApp number? [Section titled “Can I connect more than one WhatsApp number?”](#can-i-connect-more-than-one-whatsapp-number) Yes. Each number is its own channel. Add it to the same inbox or to a different one, for example one inbox per brand or region. ### What do Quality and Daily Limit mean? [Section titled “What do Quality and Daily Limit mean?”](#what-do-quality-and-daily-limit-mean) Meta rates every business number. **Quality** reflects how customers respond to your messages, and **Daily Limit** is how many customers you can start conversations with in a day. Both are set by Meta and shown in Fufa as Meta reports them. ### Where do I manage message templates? [Section titled “Where do I manage message templates?”](#where-do-i-manage-message-templates) In **Settings → Templates → WhatsApp**. You can create a template, pick one from the library, and see each template’s approval status. ## Related [Section titled “Related”](#related) * [Reply from the inbox](/inbox/reply/) * [Add live chat to your website](/channels/live-chat/) * [Create an agent](/agents/create-an-agent/) # Connect Shopify > Link your Shopify store so Fufa imports your products and orders, your AI agents can recommend products and look up orders, and your website chat runs on your storefront. Your Shopify store is connected to Fufa. Fufa imports your catalogue and orders and keeps them in sync, so your team and your AI agents see the same products, stock and order status as your store. ## Before you start [Section titled “Before you start”](#before-you-start) * You need the **Owner** or **Admin** role in the Fufa workspace. * You need to be able to install apps on the Shopify store, as the store owner or as a staff member with app permissions. * Your store’s Shopify address, such as `your-store.myshopify.com`. You’ll find it in your Shopify admin’s address bar. ## Connect from Fufa [Section titled “Connect from Fufa”](#connect-from-fufa) 1. Go to **Settings → Ecommerce** and select **Add store**. 2. Choose **Connect Shopify**. 3. Under **Store Domain**, enter your full Shopify address, such as `mystore.myshopify.com`, and select **Connect**. 4. Shopify asks you to approve the Fufa app. Approve it. 5. You’re sent back to Fufa, which shows **Store connected successfully!** New workspaces can also connect Shopify in the setup thread at the top of the inbox. See [Create a workspace](/start/create-a-workspace/). ## What Fufa imports [Section titled “What Fufa imports”](#what-fufa-imports) Right after you connect, Fufa imports your products, collections and orders. A large catalogue can take a few minutes. After that, changes in Shopify flow into Fufa as they happen. With the store connected: * AI agents answer product questions from your catalogue, recommend items, and look up a customer’s orders. * Your team sees a customer’s orders next to their conversation. * You can follow up on abandoned carts and confirm cash-on-delivery orders with workflows. ## Show the chat on your storefront [Section titled “Show the chat on your storefront”](#show-the-chat-on-your-storefront) Shopify keeps app embeds off until you turn them on. To show Fufa’s chat on your store: 1. In Shopify, open **Online Store → Themes → Customize**. 2. Open **App embeds**, turn on Fufa’s **Chat** embed, and select **Save**. The live chat page explains the chat’s own settings. See [Add live chat to your website](/channels/live-chat/). ## Common questions [Section titled “Common questions”](#common-questions) ### What does Fufa ask Shopify for permission to do? [Section titled “What does Fufa ask Shopify for permission to do?”](#what-does-fufa-ask-shopify-for-permission-to-do) Fufa reads your products, orders, customers, draft orders and returns. It can write orders and draft orders, for example to confirm an order or create a checkout link for a customer. ### I installed Fufa from Shopify. Do I still need to connect? [Section titled “I installed Fufa from Shopify. Do I still need to connect?”](#i-installed-fufa-from-shopify-do-i-still-need-to-connect) No. Installing from Shopify connects the store and signs you in to your workspace. The store appears under **Settings → Ecommerce**. ### Can I connect more than one store? [Section titled “Can I connect more than one store?”](#can-i-connect-more-than-one-store) Yes. Select **Add store** again for each store. You can point each agent at one store or at **All stores**. ### How do I disconnect a store? [Section titled “How do I disconnect a store?”](#how-do-i-disconnect-a-store) In **Settings → Ecommerce**, select **Disconnect** on the store and confirm. Fufa stops syncing it. To remove the app completely, also uninstall it from your Shopify admin. ## Related [Section titled “Related”](#related) * [Create an agent](/agents/create-an-agent/) * [Add live chat to your website](/channels/live-chat/) * [Create a workspace](/start/create-a-workspace/) # Reply from the inbox > Open a conversation from any channel, reply or leave a private note, use canned responses and WhatsApp templates, take over from the AI agent, then snooze or close it. You answer a customer from Fufa, and your reply goes out on the channel they wrote from, whether that’s WhatsApp, live chat, Instagram, email or Telegram. The conversation stays in the inbox until you snooze or close it. ## Before you start [Section titled “Before you start”](#before-you-start) * At least one connected channel, such as [WhatsApp](/channels/whatsapp/) or [live chat](/channels/live-chat/). * Access to the inbox the conversation is in. Your role and inbox access are set in [Invite your team](/workspace/team/). ## Find the conversation [Section titled “Find the conversation”](#find-the-conversation) 1. Open **Inbox**. Your inboxes and saved views are in the left panel. 2. The list shows **Open** conversations. Switch to **Snoozed** or **Closed** to see the others, and use **Sort by** for **Latest**, **Oldest** or **Priority**. 3. Select a conversation. To skim it first, use **Preview AI summary** in the list. Fufa writes the summary as the conversation progresses. ## Reply [Section titled “Reply”](#reply) 1. In the composer at the bottom, make sure **Reply** is selected. 2. Type your message. Attach files, add emoji, or type `/` to insert a canned response or a WhatsApp template. 3. Select **Send**. To send it later, choose **Schedule send** instead, or **Save as draft** to finish it later. To talk to your team without the customer seeing it, switch to **Note**. Notes are visible only to your team and are never sent to the contact. ## Take over from the AI agent [Section titled “Take over from the AI agent”](#take-over-from-the-ai-agent) If an AI agent is handling the conversation, the header says someone else is handling it. Select **Take over**, then **Take over for 30 minutes** or **Take over forever**, and reply yourself. Select **Hand back** when the agent can continue. ## Snooze or close it [Section titled “Snooze or close it”](#snooze-or-close-it) From the conversation header: * **Snooze** hides the conversation until **Later today**, **Tomorrow**, **Monday**, **One week**, **One month**, or a **Custom** time. It reopens when the time comes or when the customer writes again. * **Close** marks it done. **Reopen** brings it back. * **Add tag**, **Mark as unread**, **Report spam** and **Move to trash** are also in the header. To act on many conversations at once, select them in the list and use the bar that appears: **Close**, **Add tag**, **Assign**, **Reopen** and more. ## Common questions [Section titled “Common questions”](#common-questions) ### Why does the composer ask me to choose a template? [Section titled “Why does the composer ask me to choose a template?”](#why-does-the-composer-ask-me-to-choose-a-template) On WhatsApp you can only send a free-form message within 24 hours of the customer’s last message. After that, select **Choose template** and send an approved WhatsApp template. When the customer replies, you can write freely again. ### How do I create canned responses? [Section titled “How do I create canned responses?”](#how-do-i-create-canned-responses) Go to **Settings → Templates → Canned responses** and add the replies your team sends often. In any conversation, type `/` and start typing the name to insert one. ### Can my team see who is replying? [Section titled “Can my team see who is replying?”](#can-my-team-see-who-is-replying) Yes. Assigned conversations show who owns them. Assign a conversation from the header or with **Assign** in the bulk actions bar. Turn on **Auto-assignment** in an inbox’s settings to spread new conversations across available teammates. ### Does the customer see my notes? [Section titled “Does the customer see my notes?”](#does-the-customer-see-my-notes) No. Notes are visible only to your team and are never sent to the contact. ## Related [Section titled “Related”](#related) * [Invite your team](/workspace/team/) * [Create an agent](/agents/create-an-agent/) * [Connect WhatsApp](/channels/whatsapp/) # Invite your team > Invite teammates by email, give each one a role (Admin, Supervisor or Agent), and choose which inboxes they can work in. Your teammates join your workspace and share the inbox. Each one has a role that sets what they can change, and an inbox list that sets which conversations they work on. ## Before you start [Section titled “Before you start”](#before-you-start) * You need the **Owner** or **Admin** role in the workspace. * Your teammates’ email addresses. ## Invite a teammate [Section titled “Invite a teammate”](#invite-a-teammate) 1. Go to **Settings → Team** and select **Invite member**. 2. Enter their **Email address**. 3. Choose a role: **Admin**, **Supervisor** or **Agent**. See [Roles](#roles) below. 4. Under **Inbox access settings**, select the inboxes they should work in. 5. Select **Send invitation**. Fufa shows **Invitation sent successfully**. Your teammate gets an email. They open it, sign in with the invited address, and join your workspace. Until then, the invitation is listed under **Settings → Team**, where you can cancel it. ## Roles [Section titled “Roles”](#roles) | Role | What they can do | | -------------- | ------------------------------------------------------------------------------------------------------------ | | **Owner** | Everything, including billing. The person who created the workspace. The owner role can’t be changed. | | **Admin** | Full access to all settings and features: channels, inboxes, team, agents, workflows, campaigns and billing. | | **Supervisor** | Manages conversations and works with agents and workflows. Can view billing but not change it. | | **Agent** | Views and replies to conversations in their inboxes. | ## Change a role or inbox access [Section titled “Change a role or inbox access”](#change-a-role-or-inbox-access) 1. In **Settings → Team**, open the teammate. 2. In **Edit team member**, change the **Role** or the **Inboxes** they can access. 3. Select **Save changes**. To remove someone, choose **Remove Member** from their row. They lose access right away. Their past replies stay in the conversations. ## Common questions [Section titled “Common questions”](#common-questions) ### My teammate didn’t get the invitation. What now? [Section titled “My teammate didn’t get the invitation. What now?”](#my-teammate-didnt-get-the-invitation-what-now) Check that the email address is right and ask them to look in spam. If it’s wrong, cancel the invitation in **Settings → Team** and send a new one. ### Which role should support staff get? [Section titled “Which role should support staff get?”](#which-role-should-support-staff-get) Give **Agent** to people who only answer customers. Give **Supervisor** to team leads who also shape how agents and workflows behave. Keep **Admin** for the few people who connect channels and manage billing. ### Can someone belong to more than one workspace? [Section titled “Can someone belong to more than one workspace?”](#can-someone-belong-to-more-than-one-workspace) Yes. A person can be invited to several workspaces and switch between them. Their role is set separately in each one. ## Related [Section titled “Related”](#related) * [Reply from the inbox](/inbox/reply/) * [Create a workspace](/start/create-a-workspace/)